
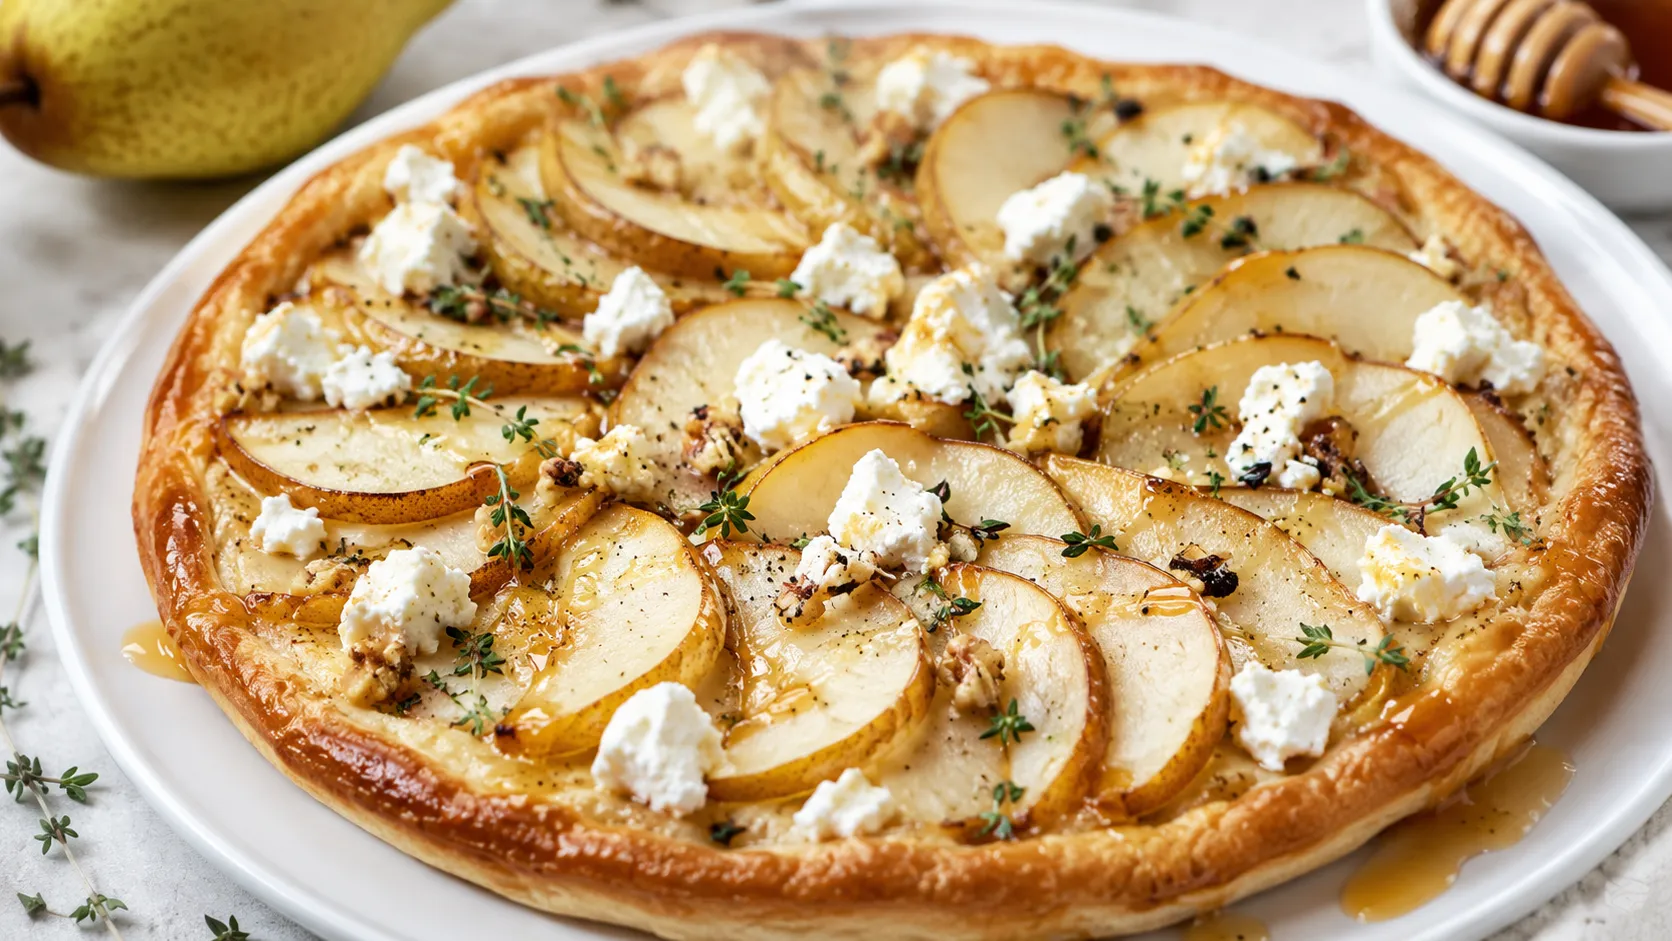
Easy Pear Tart with Goat Cheese and Honey (30 Minute Recipe)
I brought a bottle of wine to my first real dinner party in my late twenties, completely convinced that was enough of a contribution. My friend hosting it had other plans and put me on dessert duty instead, with about two hours’ notice and a kitchen I barely knew how to navigate.
I found a sheet of puff pastry in her freezer, a few overripe pears on the counter, and a log of goat cheese in the fridge that seemed too good to just serve on a cracker. I had never made a tart in my life. I folded the edges of that pastry by instinct, drizzled honey over the top like I knew what I was doing, and hoped for the best.
It came out of the oven golden, blistered in all the right places, and the goat cheese had gone soft and tangy against the sweet, caramelized pears. Someone asked who catered dessert. I never told them the truth until years later.
That tart became the thing I make whenever I want to look far more accomplished in the kitchen than the actual effort requires. It’s been my go-to for dinner parties, brunches, and lazy Sunday afternoons ever since.
Why You’ll Love This Recipe
- Looks incredibly fancy for almost no effort — store-bought puff pastry does most of the heavy lifting.
- Sweet and savory in perfect balance — the tangy goat cheese keeps this from tasting like just another fruit dessert.
- Ready in under an hour, start to finish, including baking time.
- Impressive for guests but simple enough for a random Tuesday when you want something special.
- Minimal ingredients, most of which you can find at any regular grocery store.
Ingredients You’ll Need
For the Tart
- 1 sheet frozen puff pastry, thawed (about 8–9 ounces)
- 2 ripe but firm pears (Bosc or Anjou work best), thinly sliced
- 4 oz goat cheese, softened and crumbled
- 2 tablespoons honey, plus extra for drizzling
- 1 tablespoon unsalted butter, melted
- 1 teaspoon fresh thyme leaves, plus extra for garnish
- 1 egg, beaten (for the egg wash)
- Pinch of flaky sea salt
Substitution tip: No fresh thyme on hand? A pinch of dried thyme or fresh rosemary both work as a substitute, though fresh thyme really is worth seeking out here for that subtle herbal note.
Optional Additions
- ¼ cup chopped walnuts or pecans, for added crunch
- A splash of balsamic glaze, for drizzling before serving
A note on pears: choose pears that are ripe enough to smell sweet but still firm to the touch. Overripe, mushy pears will release too much liquid and leave you with a soggy tart.

Step-by-Step Instructions
Step 1: Thaw the Puff Pastry (30–40 minutes)
Take your puff pastry out of the freezer and let it thaw in the fridge for about 30–40 minutes, or on the counter for 20 minutes if you’re short on time. It should feel cold but pliable, not stiff and cracking when you unfold it. If it starts sticking to itself or getting too soft, pop it back in the fridge for 10 minutes.
Step 2: Prep Your Oven and Baking Sheet (5 minutes)
Preheat your oven to 400°F (200°C). Line a baking sheet with parchment paper.
Step 3: Roll Out the Pastry (5 minutes)
Unfold your thawed puff pastry onto the lined baking sheet. Using a rolling pin, gently roll it out just slightly to smooth out the fold lines, keeping it roughly rectangular. Using a sharp knife, score a border about ¾ inch in from the edges, cutting only about halfway through the dough — this creates that classic puffed-up crust without cutting all the way through.
Step 4: Prick the Center (2 minutes)
Using a fork, prick the inside of the border all over. This keeps the center from puffing up too much while the edges rise beautifully around it.
Step 5: Add the Goat Cheese (3 minutes)
Crumble the softened goat cheese evenly over the center of the pastry, staying inside the scored border. Softened cheese spreads more easily and melts more evenly than cold cheese straight from the fridge.
Step 6: Arrange the Pears (5 minutes)
Slice your pears thinly, about ⅛ inch thick — thin enough that they cook through but thick enough to hold their shape. Arrange them in slightly overlapping rows over the goat cheese, like fanned-out playing cards.
Step 7: Add the Finishing Touches (3 minutes)
Brush the melted butter gently over the pears. Drizzle with the 2 tablespoons of honey and scatter the fresh thyme leaves over the top. Brush the egg wash along the scored border only, avoiding the center, to help it turn deeply golden and crisp.
Step 8: Bake the Tart (22–25 minutes)
Bake for 22–25 minutes, until the border has puffed up and turned a deep golden brown, and the pears look slightly caramelized at the edges. The center should look set, not wet or doughy.
Step 9: Finish and Serve (5 minutes)
Remove from the oven and let it cool for about 5 minutes on the baking sheet. Drizzle with a little extra honey, a pinch of flaky sea salt, and a few more fresh thyme leaves for garnish. Slice into squares or rectangles and serve warm.
Pro Tips & Tricks
- Keep your puff pastry cold until it goes in the oven. Warm, soft pastry won’t puff up properly — if your kitchen is hot, pop the assembled tart in the fridge for 10 minutes before baking.
- Don’t skip scoring the border. This one trick I discovered by accident on that very first attempt, and it’s the entire reason the edges puff up dramatically while the center stays flat and holds the toppings.
- Slice your pears thin and even. Uneven slices cook unevenly, leaving you with some pieces mushy and others still firm.
- Serve it warm, not hot. Straight out of the oven, the goat cheese is almost too soft to hold its shape when sliced. A five-minute rest firms everything up just enough.
- Make the components ahead, assemble last minute. You can slice the pears and crumble the cheese hours ahead, but assemble and bake the tart right before serving for the best texture.
Variations & Substitutions
If you want a vegan version, swap the goat cheese for a plant-based soft cheese alternative and use a store-bought vegan puff pastry (many major brands are accidentally vegan since they use plant-based fats — just check the ingredient list). Swap the egg wash for a little plant milk brushed over the border instead.
For a savory spin, add a few thin slices of prosciutto tucked under the pears before baking. The salty, slightly crisp prosciutto against the sweet pears and tangy cheese turns this into a fantastic appetizer instead of a dessert.
Want a nuttier, more autumnal version? Sprinkle chopped walnuts or pecans over the top before baking, and swap the thyme for a few fresh rosemary leaves. It leans the whole tart in a cozier, more fall-forward direction.
Serving Suggestions
This tart works beautifully as a light dessert after dinner, especially paired with a glass of dessert wine or a crisp Sauvignon Blanc. It also makes a stunning addition to a brunch spread, served alongside coffee or a simple green salad.
I’ve served it at everything from casual weeknight dinners to holiday gatherings, and it somehow always fits the occasion, dressed up or down depending on what else is on the table.
FAQs
Can I make this tart ahead of time?
You can prep the components ahead — slice the pears, crumble the cheese, and even roll out the pastry a few hours in advance, storing everything separately in the fridge. For the best texture, assemble and bake the tart just before serving.
Can I reheat leftover pear tart?
Yes, reheat leftover slices in a 350°F oven for about 5–8 minutes, just until warmed through and the pastry crisps back up. Avoid the microwave, since it makes the puff pastry go soft and chewy instead of flaky.
Can I use a different fruit instead of pears?
Absolutely. Thinly sliced apples work just as well and follow the same method exactly. Figs are another lovely swap when they’re in season, though you won’t need to slice them as thin.
What if my puff pastry doesn’t puff up evenly?
This usually means the pastry got too warm before baking, or the oven wasn’t fully preheated. Keep the assembled tart cold right up until it goes into a fully preheated oven for the best rise.
Can I freeze this tart?
This one’s best fresh, but you can freeze the baked and cooled tart for up to a month. Reheat directly from frozen in a 350°F oven for about 12–15 minutes, though the texture won’t be quite as crisp as it is fresh.
My tart turned out soggy in the center. What went wrong?
This usually happens when the pears are too ripe and release extra liquid, or the center wasn’t pricked with a fork before baking. Choose firmer pears and don’t skip that pricking step for the best results.
Read More Recipes:
- Brown Butter Texas Sheet Cake
- Easy Paleo Pecan Pie Bars
- Delicious Chewy Pecan Pie Bars Recipe
- Easy Pecan Pie Cheesecake Recipe
- Butter Pecan Praline Poke Cake
Final Thoughts
This pear tart with goat cheese and honey started as a dessert emergency and turned into one of my most-requested recipes, which feels like proof that some of the best kitchen discoveries happen completely by accident.
If you make this, I’d love to hear how it turns out for you, or what fruit and cheese combination you try next. Leave a comment and let me know — and don’t be afraid of that puff pastry. It’s far more forgiving than it looks.


Easy Pear Tart with Goat Cheese and Honey
Ingredients
Method
- Preheat the oven to 400°F (200°C) and line a baking sheet with parchment paper.
- Unfold the puff pastry onto the prepared baking sheet and gently smooth out any creases.
- Lightly score a 1-inch border around the edge of the pastry without cutting completely through.
- Prick the center of the pastry several times with a fork.
- Spread the softened goat cheese evenly over the center, staying inside the scored border.
- Arrange the thinly sliced pears in overlapping rows over the goat cheese.
- Brush the pears lightly with melted butter.
- Drizzle 2 tablespoons of honey over the pears and sprinkle with cinnamon, thyme, walnuts, and sea salt.
- Brush the pastry border with beaten egg.
- Bake for 22–25 minutes, until the pastry is puffed and golden brown and the pears are tender.
- Remove from the oven and let the tart cool for 5–10 minutes.
- Drizzle with additional honey and sprinkle with fresh thyme before slicing and serving.
Notes
- Choose pears that are ripe but still firm, so they hold their shape while baking.
- Bosc or Anjou pears work especially well for this tart.
- Keep the puff pastry chilled until ready to use for the best rise.
- Toast the walnuts beforehand for extra flavor and crunch.
- For a sweeter version, add a light sprinkle of brown sugar before baking.
- Serve warm or at room temperature.
- Store leftovers covered in the refrigerator for up to 2 days and reheat briefly before serving.
DID YOU MAKE THIS EASY RECIPE?
If you have, then share it with us by sending a photo. We’re excited to see what you've made:-)Printable Recipe Card
Want just the essential recipe details without scrolling through the article? Get our printable recipe card with just the ingredients and instructions.


